I spotted a warming tray at a garage sale recently, still in its original 1970s box. I'd had my eye out for one ever since I saw a video where a woman used a similar tray to create some really cool art using crayons. In the video, the warming tray melted the crayons just enough that their color practically popped off the page.
I wasn't sure if it would be as easy as the woman in the video had made it seem, and I certainly wasn't sure if the warming tray would be safe for my kids to work on...but thought for the $3 asking price, it was worth a try.
Turned out it was worth every penny. It was a fun, easy craft with the added bonus that the melted crayon artwork took on a stained glass effect when hung in the window. Both my kids, 5 and 7, loved it. The tray got warm, but not hot enough to burn. I supervised closely, however, to make sure there were no accidents.
Want to try it yourself?
Here's how:
Step 1: Setting up
Here's what you'll need:
- A warming tray (a warming tray works best because it stays at a consistent temperature, but you can also use a warmed cookie tray. It'll cool quickly though, so keeping two on rotation — one in the oven and one at the workstation — can keep kids from losing interest.)
- Crayons
- Paper (we used plain computer paper)
- Paper towels (for cleanup)
- Aluminum foil (optional)
Step 2: Create!
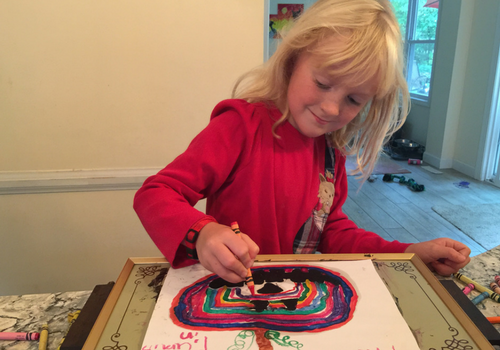
- Simply place a piece of paper on the warming tray and begin to draw! The crayons will melt just enough to easily glide over the paper in vibrant, paint-like colors. Don't worry if color gets on the warming tray itself — while it's still warm, you can wipe it clean with a paper towel.
- In fact, my daughter drew a design directly onto the warming tray and then put a new piece of paper on top of it. When we picked it up it made a cool texture on the piece of paper — kind of like a Rorschach test. I wiped up the excess melted wax with a paper towel with no problem.
- While our warming tray didn't heat up hot enough to make me worry about burns, be careful with yours — make sure it's safe to the touch. Even if it is, this is an activity that definitely requires adult supervision!
Step 3: Hang up your artwork!
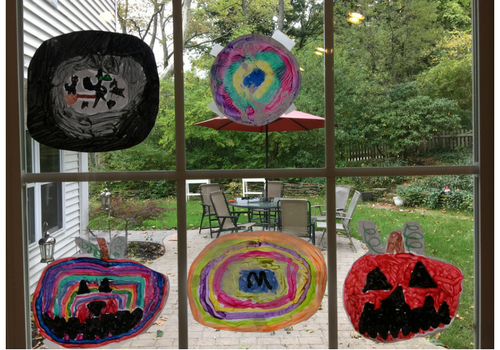
- The finished products took on an unexpected stained glass effect when held up to light, so we cut them out and taped them to windows in the living room. They look great and add a pop of color to gray fall days.
Step 4: Clean up
- Easy! I wiped down the tray with damp paper towels before unplugging to get the last residue of wax off. Clean up would have been even easier if I'd used aluminum foil. Next time!
This was an unexpectedly fun and easy craft that was simple to organize and clean up. I'm looking forward to the kids creating more themed art pieces through the year for our windows!
| You may also like | ||
 |  |  |
| FREE and Cheap Summer Movies | ||
----------------------
Get a FREE kid-friendly event calendar for families living from downtown B'ham and south to Alabaster full of festivals, fairs, activities, events and more! Sign up by clicking HERE!
Macaroni Kid South Birmingham is a free weekly e-newsletter and website focused on fun family events and things to do with kids in the South Birmingham region. We gather together all kinds of local family events and activities each week, and add useful information about classes, family-focused businesses, book and product reviews, recipes, crafts, school and camp guides and more. We proudly serve families in downtown Birmingham, Mountain Brook, Homewood, Vestavia Hills, Hoover, Pelham, the Oak Mountain and 280 area, Helena and Alabaster.